After a lot of trial and error I found a very good way to take decent photos of my models with very little effort, and without using anything fancy like light boxes, expensive cameras, flashes, diffusers and whatnot.
So here is how I do it:
1. Get yourself a half-decent camera. I use a Canon PowerShot A540. It's an old point and click camera, 6 megapixels, and you can get it or something similar for $35 on ebay.
2. Get some nice backgrounds for your photography, and print them out. The ones I use are available at:
http://corvusminiatures.blogspot.com/2010/04/cloud-backdrops-for-your-miniature.html
http://www.warbard.ca/2011/01/11/gradient-backgrounds-for-photography/
3. Print out your backgrounds on a high quality color laser printer, on slightly thicker paper (you want this thing to last you for a bit)
4. Set up the area where you will take the photo. I do everything on my busy computer desk. I use my netbook and mouse pad to hold the backdrop:
5. Get a little tripod for your camera (here is the one I have):
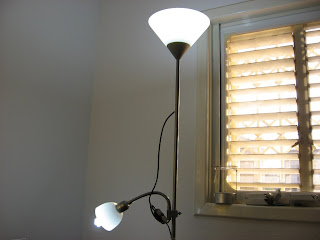
6. Get a dual light source (I use a fancy Ikea lamp :) )
Have one light source pointed at your model, and the other toward the ceiling. Also, make sure to take your photos in the evening if your setup is right next to the window (like mine is).
7. Set up your camera! This is by far the most important step. First thing you want to do is set your camera to manual. Set it to lowest ISO value it will do (higher iso means more sensitivity, meaning shorter exposure, meaning more granulated pictures). Set the timer, turn off the flash, and choose macro mode. Play with Aperture and Exposition time until you see something you like on your camera LCD screen.
8. Focus your camera, start the timer, and stop breathing for ten seconds :) Using low ISO setting and no flash means that your camera will need a rather long exposure to take the shot, so you don't want it to move at all while taking the photo.
9. Here is how your photo should look like at this stage: (this is a bad photo actually since I didn't position the model as I wanted with white clouds in the background, but it will serve the purpose)
10. Now is the time for some post processing. Open the photo in your favorite image manipulation software. I use GIMP, available at http://www.gimp.org, which is open source, free, and almost as powerful as Photoshop, to crop the picture, do color leveling, and scale the cropped photo to 800 px width. For color leveling I don't play with curves, and just let GIMP automatically adjust it for me. Feel free to play around with the photo until you are happy with it.
11. The end result should look like this:
Hope this tutorial helps you folks out :)


Nice stuff, and thanks for the link to my set of gradients!
ReplyDeleteThe irony is that I don't currently have a printed set of my own gradients, as my printer at home packed it in and I keep forgetting to print on work's nice big colour laser...
Print them out ASAP!
ReplyDeleteI have to say that those gradients of yours were a life saver. I was looking for ages for something good till I found yours :) I have two printed sets. One on heavier gloss paper, and one set I have is laminated.